Home → Software → Printer Friendly Version
Software
- 1. Adobe CC
- 2. Blackbaud
- 3. Destiny
- 4. Google Chrome
- 5. Internet Explorer
- 6. Horizon Software
- 7. Microsoft Office
- 8. My Files
- 9. Safari
- 10. Smart Notebook
- 11. Testing
- 12. Zoom
- 13. Filemaker Pro
1. Adobe CC
1.1. New to Adobe CC
Follow this link to open a Google Doc that will lead you through the process of upgrading to Adobe CC:
https://docs.google.com/document/d/1O26YXgPulzVrW-pksnM-TaHSF3aZ3fu7CJH74_ffqWU/edit?usp=sharing
2. Blackbaud
2.1. VMware Horizon Client
1) Go to https://bwsapps.bwscampus.com/ and download the VMware Horizon client.
Do not download the HTML option.
2) Click on Go to Downloads and Download
3) Once you have downloaded the software, click on New Server.
It will then ask to “Enter the name of the Connection Server”
4) Type in bwsapps.bwscampus.com
Once you have entered the server name, you can enter your BWS credentials
You should then see a menu of apps (such as EE and RE)
3. Destiny
3.1. Update Patron Photos
To upload new/updated photos into Destiny:
1. Request photos from Communications department in desired size (20KB) with ID numbers as the file name — They can obtain these from the school photographer or convert in-house if time allows.
2. Create import file in required format* (export may be obtained from our SIS; you can request this from the Tech Department or Richard Payan). In EE there is an export saved for current 7-12 names "Library Export for Photo Update" that can be used to create the above file. If needed you can request assistance with formatting the file or see attached instructions for converting from CSV to TXT and modifying format.
3. Process the upload (see library for specific steps in Destiny application).
*More information regarding the import is below
From Destiny:
About the map file
The picture-to-patron map file links each image file to the appropriate patron record. This file may be provided by a photography service, such as Lifetouch National School Studios or Herff Jones, or you can create it yourself.
In any case, it is important to verify that the map file is formatted and named correctly:
- The map file must be named idlink.txt.
- Each patron's information takes up one line of the map file.
- Each line in the map file must contain
"patron barcode","picture file name"
(The quotes are optional but the comma is critical.)
- Each line in the map file must end with a carriage return.
- The map file does not contain a header line.
- All pictures must be .gif, .jpg, .jpeg, or .png files.
Note: For optimal uploading, we recommend that the size of each picture file be approximately 20 KB.
The following is a sample of a picture-to-patron map file:
"639465","00002.jpg"
"688692","00003.jpg"
"859228","00004.jpg"
"971657","00005.jpg"
"752899","00006.jpg"
4. Google Chrome
4.1. Updating Chrome
Step 1) Open Chrome and click "More" (the 3 dots on the top right)
Step 2) Click on Settings
Step 3) Click on "About Chrome"
Step 4) Allow for Google Chrome to search for an update or click on Update Chrome
Step 5) Once it’s finished updating click on “Relaunch”
Step 6) If your Chrome is up to date it will show up as :
4.2. Enable Browser Cookies for Brentwood Gmail
https://docs.google.com/document/d/1a0DFn0o9_k08RT2Y0pNLFXeo1OQZ1gFgcon9sMWbDcY/edit?usp=sharing
4.3. Clear Google Chrome Browser Cookies
If you're experiencing any errors that mention "browser Cookies" while using Google Chrome, click the link below and follow the steps listed to clear Google Chrome's Cookies:
https://docs.google.com/document/d/1kDt-GcBzHTI0tfXrPDChBCK8albSxvPzvFA9eaPZLtE/edit?usp=sharing
4.4. Remove Browser Extensions
Disabling or Removing Chrome Browser Extensions
If your Chrome browser starts redirecting to odd pages or showing ads when you click a link, most often this is not caused by a virus, but by the addition of a Browser Extension.
You can disable or remove any unwanted Browser Extensions by following the steps below:
1. Click on the three vertical dots in the upper right-hand portion of your Chrome window:
2. In the menu that appears, mouse-over the More Tools item and click on Extensions from the new list that appears:
3. Find any of the Browser Extensions that you don’t recognize and disable them (via the switch in the lower right hand corner of the boxed description) or click the Remove button to delete them:
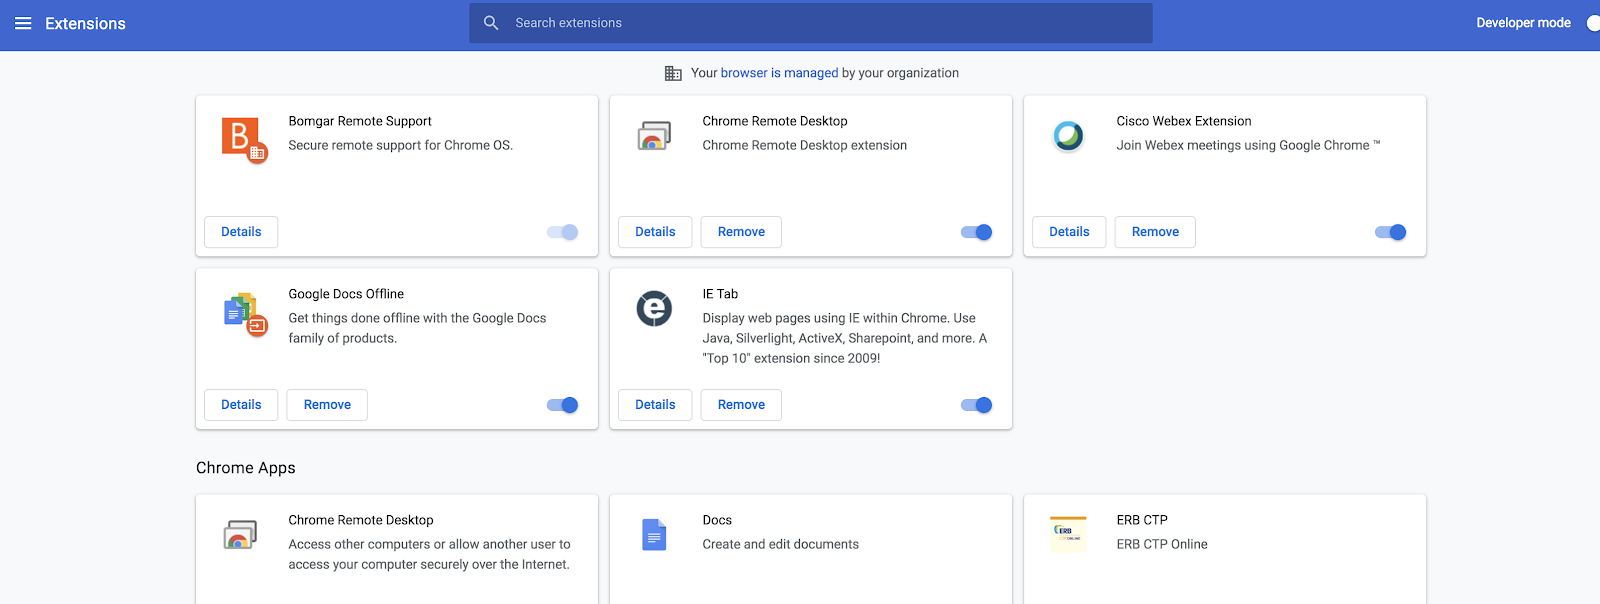
4. Quit Chrome and re-open it for the changes to take place:
5. If this doesn’t resolve the issue, call the helpdesk (X1234, Option 1) for further assistance.
4.5. Clear Cache
To clear your browser cache in Google Chrome:
1. Click the Menu Icon at the upper right. It will look like three horizontal dots.
2. Select More Tools.
3. Click Clear Browsing Data.
4. Change the dropdown option to "All time"
5. Check only the option for Cached images and files and click Clear Data.
4.6. Webpage Privacy Warning
If you are trying to get to a known safe website and came across this error below, You used to be able to click (Advanced) then proceed to the website.
This is not the case with Catalina and Chrome now. MacOS version won't see the proceed button even you click advanced button.
To still proceed the visit as you are sure this page is safe, here is a easy way to do:
There's a secret passphrase built into the error page. Just make sure the page is selected (click anywhere on the screen), and just type thisisunsafe.
5. Internet Explorer
5.1. Clear Cache
To clear your browser cache in Internet Explorer:
1. Click on the Tools Menu (or Gear Icon) at the upper right.
2. Select Internet Options.
3. In the new window, on the General tab, locate Browsing History and click the Delete button.
4. Check only the options for Temporary Internet files and website files, then click Delete.
5. Hit Apply when you return to the main Tools Window.
5.2. Internet Explorer won't open
We don't recommend using Internet Explorer, however some websites or applications require it to be used from time to time. If you run into a situation where you repeatedly double click on IE or try to launch it from the taskbar or your program files to no avail, try the steps below. They almost always work sometimes.
1) Go to Start>Control Panel and open the Internet Options applet
2) Go to the Advanced tab
3) Click the "Reset Settings" button
4) Make sure the "Delete personal settings" box is ticked and press OK.
5) Try running IE again and see if that fixed it.
6. Horizon Software
6.1. Saving Documents in Horizon
When working on the Horizon Client do not select This PC as it will save to the Horizon Server. Instead scroll down and save the document to you network drive or locally on your computer.
username(\\fs1\users) is your network drive.
username on computer name is the computer you are working on.
7. Microsoft Office
7.1. How to download and install Microsoft Office 365 (Word, PowerPoint, Excel, etc.)
To download the entire Microsoft Office 365 Suite:
-
Open a web browser and go to office.com
-
Click on the sign in button
-
Use your full Brentwood School email address and password to sign in (see below)
To download individual apps from the Microsoft Office 365 Suite:
After installing the individual app, you will need to log in with your BWS credentials.
You will need to login in order to edit any documents.
Follow the directions below:
Click "Work or School Account" and finish logging in
8. My Files
8.1. Access Network Files From Home
If you have saved your files to any of your network drives on campus (P Drive or S Drive), you can access them online from anywhere by going to www.bwscampus.com/myfiles
You'll be asked to login with your Brentwood School credentials (your username and password)
This will allow you to browse, download, and upload your files from any off-campus computer.
**If you need to make any changes to a file, download a copy of it through your browser, make any edits, then upload the new version of the file.**
If you need further instruction, please contact the help desk at x1234 or (310) 889-2734.
9. Safari
9.1. Updating Safari
Step 1) Click on the Apple icon on the top left corner
Step 2) Click on System Preferences
Step 3) Click on Software Updates
Step 4) If there are any updates available, click the Update Now button to install them. You can also click on ”More info” to see details about each update and select specific updates to install.
**If the Software Update says that your Mac is up to date; it means the installed version of macOS and all of its apps are also up to date (including Safari)**
9.2. Clear Cache
To clear your browser cache in Safari:
1. Click on the Safari drop-down menu and select preferences.
2. Click on the advanced tab and select the Show Develop menu in menu bar checkbox.
3. Develop should now be in available to click on at the top of the screen. Select it to drop down the menu and click Empty Cache.
10. Smart Notebook
10.1. Smart Notebook Licensing
To activate the license for your copy of Smart Notebook or you have a message showing a "Your trial period has ended" message, do the following:
- Close and re-open Smart Notebook; you should see the following window:
- Click the "Sign In" button. On the new web page that opens, click Sign in with Google:
- Select your Brentwood gmail account (*your username*@bwscampus.com — you may need to enter your password if you're not already logged into your email) and a new window will appear:
- Click OK to close the window, then click OK again on the Smart Notebook License Status window (which will no longer display a Sign In button) and you'll be able to use the licensed version of the software.
11. Testing
11.1. ERB
Secure browser application download attached (for Mac only).
For support please contact:
CTP Operations
(866) 683-2335 or (646) 503-2699
CTPOperations@erblearn.org
12. Zoom
12.1. Zoom Local Recording
Zoom Article for Local Recording:
https://support.zoom.us/hc/en-us/articles/201362473-Local-recording
12.2. Logging in to Zoom
See the attached instructions to access your Zoom account.
12.3. Managing Cloud Recordings
To access and manage your cloud recordings before they disappear, please watch this video for a quick tutorial.
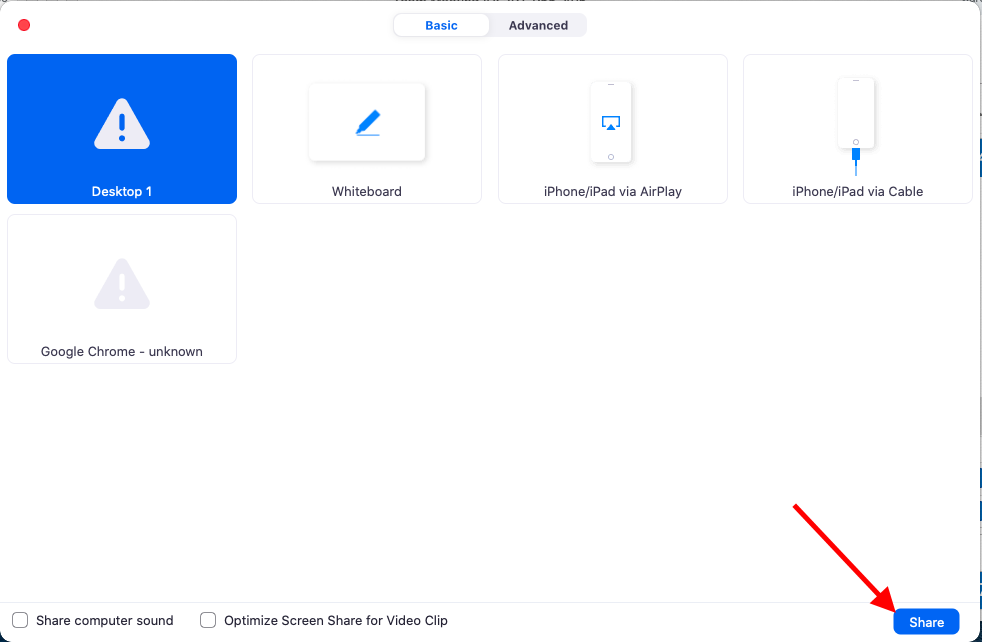
12.4. Screen Sharing
macOS Catalina added a new category of app permissions called "Screen Recordings". This prevents a user from being able to share their screen through an app until permission is given specifically for that app.
If you have NOT granted this permission, then if you try to share your screen through the Zoom app, there will be error images instead (showing an exclamation mark inside of a rectangle, instead of a preview of what you might be able to share):

- During A Session
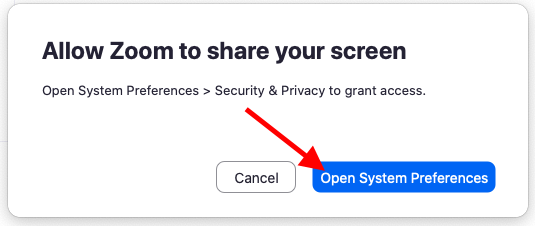
2. A pop up with appear with a button to "Open System Preferences". Click on that button.
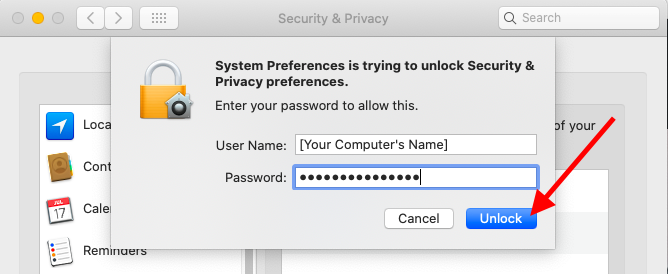
3. This will open your System Preferences in a new window. It should automatically open to the "Security & Privacy" section, and the "Privacy" tab, with the "Screen Recording" category selected. Click on the lock symbol in the lower left hand corner to make changes.
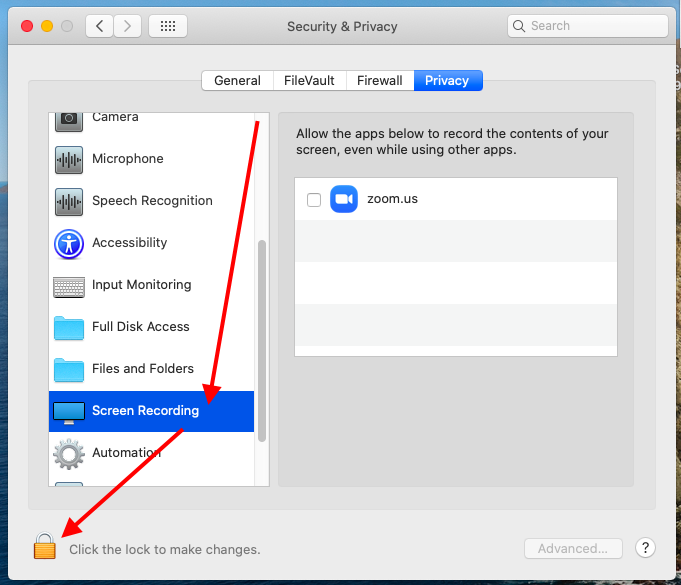
6. You will be prompted to enter the password for your computer. (The same password you use when you boot up your computer.) Then click "Unlock".
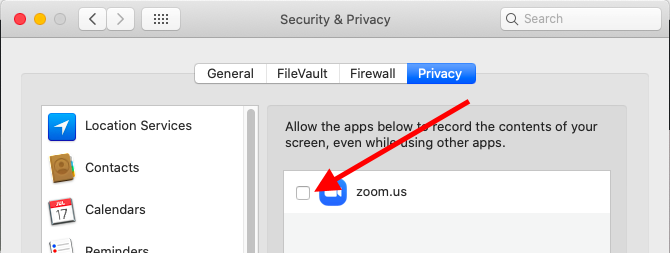
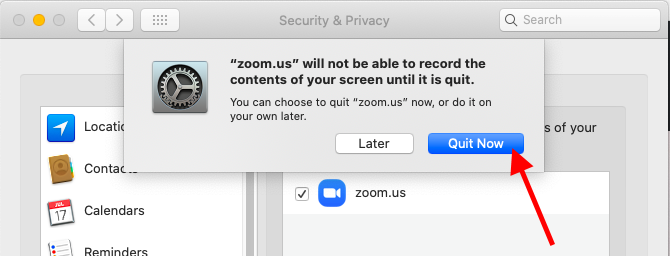
7. Once the preferences are unlocked, click on the checkbox next to "zoom.us". A prompt will appear to let you know that this setting will not be able to take effect you quit Zoom. Let the other person/people in your session know that you'll be right back, and then click "Quit Now".
- If you're the host of the session, be sure to click "Leave now", and NOT "End meeting for all". This will allow you to leave without forcing anyone else to have to reconnect.
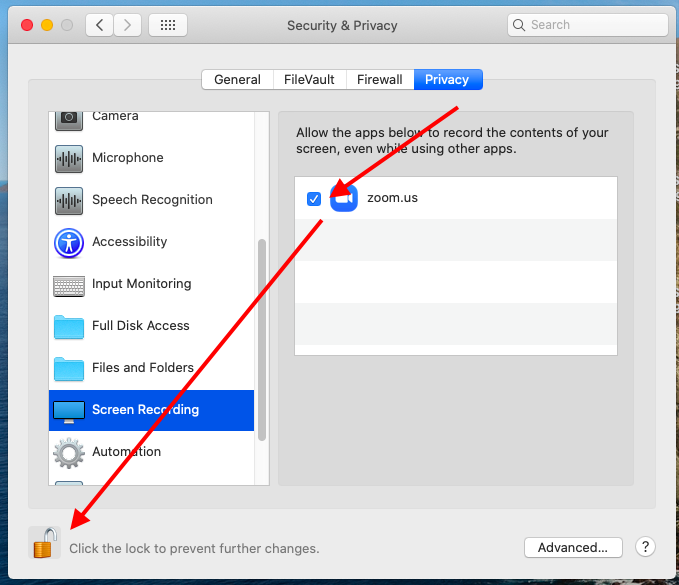
8. Click on the lock symbol again to save your changes.
9. Re-enter your session. You will now be able to share your screen.
2. Outside a session
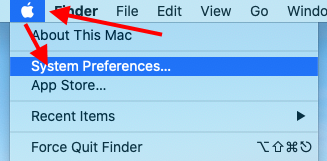
1. Click on the Apple icon in the upper left hand corner of your computer's screen, and select "System Preferences".
2. In the window that appears, click on "Security & Privacy".
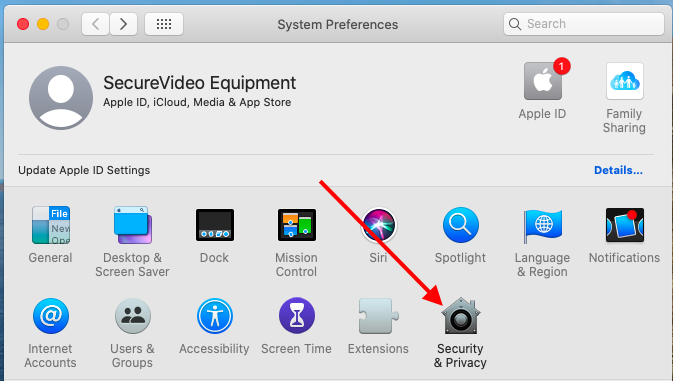
3. Scroll down the list on the left-hand side and select "Screen Recording". Then click on the lock symbol in the lower left hand corner to make changes.
4. You will be prompted to enter the password for your computer. (The same password you use when you boot up your computer.) Then click "Unlock".
5. Once the preferences are unlocked, click on the checkbox next to "zoom.us", and then the lock symbol to save changes. You will now be able to screenshare in your next session.
For additional information please check out the Screen Sharing page on Zoom.
12.5. Chromebook A/V Issues
Raise and lower your microphone or speaker volume.
- Click on the status area (bottom right corner of the screen where you see your time).
- Change the speaker volume to the desired level by adjusting the slider, left or right.
- Change your mic level by clicking on the arrow next to the volume slider.
- A window will pop up that shows input and output. Under Input, move the mic slider to your desired level.
Test your Microphone.
- Go to this website and click "Allow" to Start Mic Test".
Click record to test your sound recording or simply talk to see if your mic is detected.
Test your Camera.
- Go to this website and click "Allow" to start the test
You should now see yourself if successful
Testing your Audio (Speakers).
- Please go to this YouTube Video and listen to the audio.
- Make sure volume is raised to your desired level as shown in the hardware troubleshooting steps above.
If your microphone failed testing, you can not see yourself when testing your camera, or you can not hear the audio from the youtube video on your Chromebook. You may have a hardware issue with the camera, mic, or speakers. If you have not done so, please submit a support request.
ZOOM MICROPHONE AND AUDIO SETTINGS
While in a Zoom meeting, click on the up arrow next to the MIC icon. Settings should be as follows:
- Choose same as System (Default - Internal Mic)
- You should always use internal mic unless you have a microphone connected (BT or Wired)
- i.e. Wireless headsets or AirPods (check to see if they are muted)
12.6. More Zoom Help!
For more tips, tricks, and links to online resources check out the BWS Ed Tech Virtual Learning Site!
https://sites.google.com/bwscampus.com/bws-edtech-virtual-learning/main-course/zoom
13. Filemaker Pro
13.1. Connect to Peer Tutoring Host
Download Filemaker Pro from Self Service. This is only for specified users if you do not see it in self service contact the IT Helpdesk.
Open Filemaker and Accept License
From the main screen go to File > Hosts > Show Hosts
Click the + to add a host
Insert the information in the picture
Then The Peer Tutoring Server will be available
If the certificate pops up check the box and hit CONNECT
Then Enter your BWS Credentials
and you should be connected.