Home → Printing → Printer Friendly Version
Printing
- 1. HP Printer Malware Issue For Macs
- 2. Faculty/Staff Printing
- 3. Student Printing
- 4. Common Print Troubleshooting
- 5. Setting security PIN to copier jobs
- 6. Scanning
- 7. Copier Tutorial Videos for new Copiers in 2020
1. HP Printer Malware Issue For Macs
1.1. Driver Issue for HP Printers (Mac/Apple)
Due to a security issue caused by HP and Apple software, Mac users will typically see warning of malware that prevents them from printing to older HP printers.
In order to resolve this, the generic postscript driver must be used instead of the specific HP driver for the particular printers.
- Go to system preferences via the apple icon on the top left corner of the screen.
- Select "Printers & Scanners" and add the printer by clicking the "+" button.
- When adding the printer, select the generic postscript driver instead of whatever driver is listed.
Additional/alternative instructions can be found here on HP support:
https://support.hp.com/us-en/document/c06960563
Update:
Apple has resolved this issue with the MacOS Big Sur version 11.6 update. If your computer is experiencing this malware issue and you have not updated your OS version to 11.6 or higher, you can select the software update in system preferences to update.
2. Faculty/Staff Printing
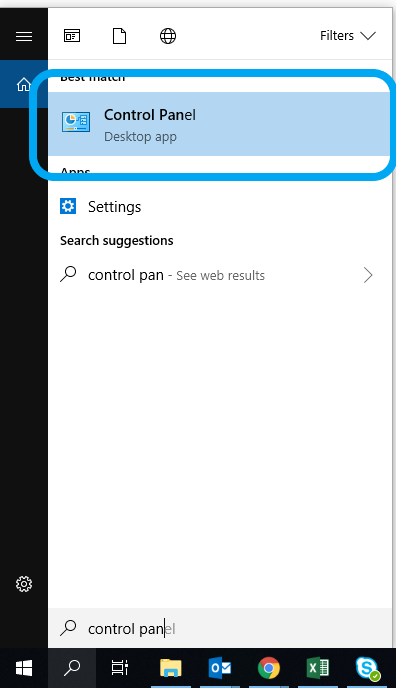
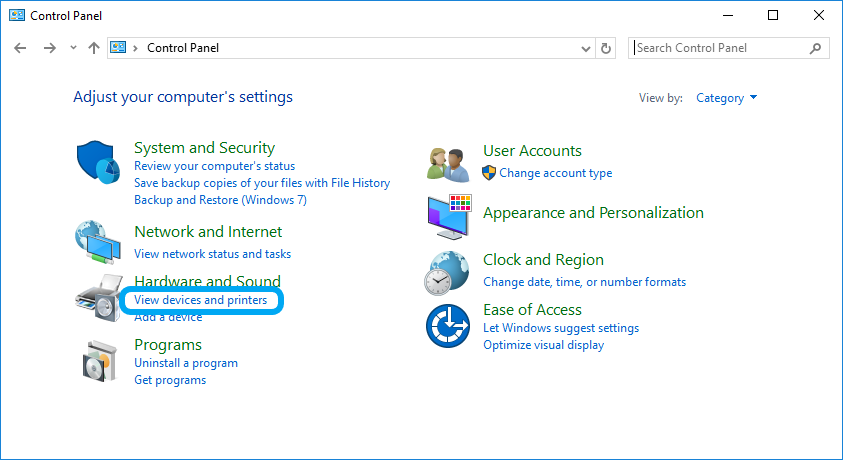
2.1. Add a Network Printer for Windows
If you need to add a printer to your workstation, or have had your printer replaced and are having trouble sending print jobs, follow the steps below to add or re-install the printer:
1, Go to Start
2. Click on Settings
3. Select (Printer and Scanners) then the (+) to Add a printer or scanner
4. Wait for the list to populate and scroll down to find the name of your printer then press (add device)
7. Repeat this for any additional printers you wish to use. You may also delete printers no longer in use from the Devices and Printers window.
2.2. Adding Printers and Copiers to Faculty Mac Computers
To add a BWS Printer or Copier to your faculty computer follow these steps
1 Use the launchpad App or Search Bar to launch Self Service
The Icon looks like the image below.
Next open Self Service and find the division your machine is located in
Then press the INSTALL button on the Printer/Copier you want to install.
3. Student Printing
3.1. Students printing with personal computers
To print on campus from your personal device, follow these simple steps:
1. Open a web browser and enter the following address -
www.bwscampus.com/print
2. Type in your Brentwood username and password. Click Login.
If you have any issues accessing your account, submit a helpdesk ticket by visiting help.bwscampus.com
3. On the left hand side, click on Web Print
4. Under Web Print, click on Submit a Job
5. Under Select a Printer, click on the printer you want to print to:
Click on Print Options and Account Selection to move forward.
6. Under Options, choose how many copies you want of your print job
Click on Upload Documents to move forward.
7. Under Upload, click on Upload from your Computer. You may also drag and drop the file you would like to print.
Make sure to print the file types listed below the upload area.
8. Click on Upload & Complete to print your job.
Once the status says "Finished: Queued for printing", visit the copier to pick up your job.
3.2. Student Printing Quick Guide
4. Common Print Troubleshooting
4.1. Printer Paused - Mac
If you're trying to print a document/file from your Mac but nothing appears to happen, even though the printer is on and isn't displaying a jam or error message, it might be the case that the print spooler is paused on your computer.
Go into System Preferences, Printers and Scanners, and look at the printer list displayed. If you see a yellow dot next to the printer you're trying to print to, the printer has been paused:
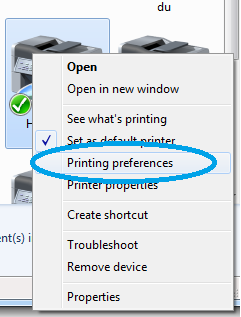
Double-click the printer to open the printer interface window and click the green button (as shown below) to resume printing.
4.2. Smudges due to thicker paper
On the printer do the following:
1. Go to the main menu and press the right arrow to go to the next page.
2. Choose "Settings"
3. Choose "Tray Paper Settings"
4. Press the "Next" button to go to page 2/4.
5. Choose "Paper Type: Bypass Tray"
6. Choose "Coated: Matte" then whichever thick paper setting you want, then press "OK"
At the Print screen on your computer do the following:
1. Open the print screen and click "Print Settings"
2. Click on "Layout" to open the drop down menu. Select "Printer features"
3. Change Feature Sets to "Paper" and change Paper Type to "Coated Matte" or the paper type you are using
4. Click print when ready
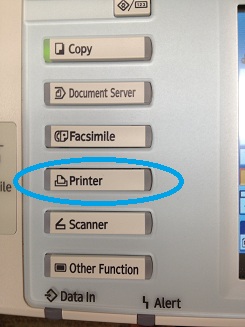
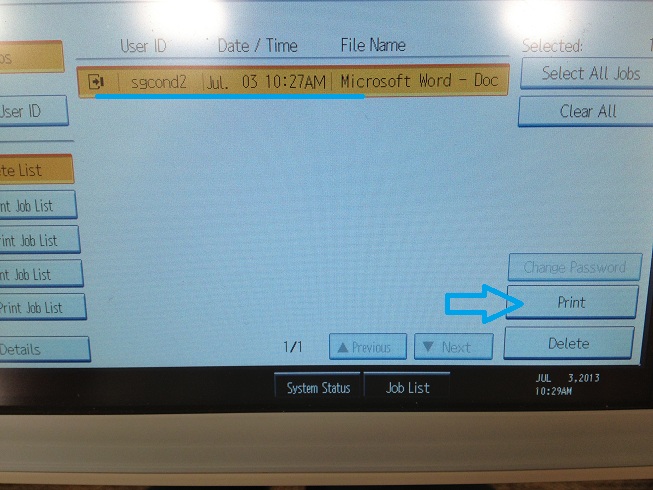
5. Setting security PIN to copier jobs
5.1. How to add PIN on Windows
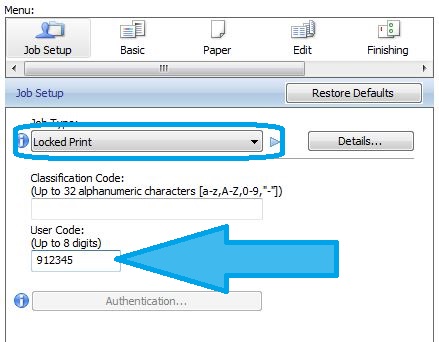
Configuring locked print and entering user code on Ricoh copiers
Share this page:
Intended audience:
All users
Many of the printers in the college are secured with a user code, and if the user code is not entered correctly on the computer that is sending a print job, the print job will not complete. Locked print allows jobs to be sent securely to the printer and held there until you actually arrive at the printer to pick them up.


6. Scanning
6.1. Add your name to the address book
To add your name to the address book on a copier/scanner:
1. Press the [User Tools/Counter] key.2. Press [Address Book Mangmnt].
3. Check that [Program / Change] is selected.
4. Press [New Program].
5. Press [Change] under "Name". The name entry display appears.
6. Enter the name, and then press [OK].
7. Press [ Next].
8. Press the key for the classification you want to use under "Select Title". The keys you can select are as follows:
• [Frequent]: Added to the page that is displayed first.
• [AB], [CD], [EF], [GH], [IJK], [LMN], [OPQ], [RST], [UVW], [XYZ], [1] to [10]: Added to the list of items in the selected title. You can select [Frequent] and one more key for each title.
9. Press [E-mail].
10. Press [Change] under "E-mail Address".
11. Enter the e-mail address.
12. Press [OK].
13. Select [E-mail / Internet Fax Destination] or [Internet Fax Destination Only].
If [E-mail / Internet Fax Destination] is specified, registered e-mail addresses appear in both
Internet fax address display and E-mail address display on the fax function screen, and in the
address display on the scanner function screen.
If [Internet Fax Destination Only] is specified, registered e-mail addresses only appear in Internet
fax display on the fax function screen.
14. If you want to use Internet fax, specify whether or not to use "Send via SMTP Server".
15. Press [OK].
16. Press [Exit].
17. Press the [User Tools/Counter] key.